Difference between revisions of "A quick guide to CVMFS"
(Added the file upload info.) |
(Added the job submission information.) |
||
| Line 11: | Line 11: | ||
===A trivial example=== | ===A trivial example=== | ||
| + | |||
| + | ====Preparing your working area==== | ||
Log in to your machine of choice and create a new working area. | Log in to your machine of choice and create a new working area. | ||
| Line 25: | Line 27: | ||
/users/whyntie/cvmfstests/helloworld | /users/whyntie/cvmfstests/helloworld | ||
</pre> | </pre> | ||
| + | |||
| + | ====Preparing your software==== | ||
Create a new directory that will form the basis of your CVMFS tarball. | Create a new directory that will form the basis of your CVMFS tarball. | ||
| Line 83: | Line 87: | ||
hello-world_001-00-00 hello-world_001-00-00.tar | hello-world_001-00-00 hello-world_001-00-00.tar | ||
</pre> | </pre> | ||
| + | |||
| + | ====Uploading and deploying the software==== | ||
Now upload the tarball to the [https://cvmfs-upload01.gridpp.rl.ac.uk/ RAL CVMFS repository]. You will need your grid certificate installed in your browser in order to access (and be identified). | Now upload the tarball to the [https://cvmfs-upload01.gridpp.rl.ac.uk/ RAL CVMFS repository]. You will need your grid certificate installed in your browser in order to access (and be identified). | ||
| Line 100: | Line 106: | ||
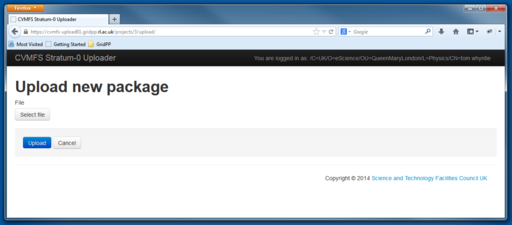
To upload the <code>hello-world_001-00-00</code> tarball, click on the blue "Upload" button. This will take you to the "Upload new package" screen: | To upload the <code>hello-world_001-00-00</code> tarball, click on the blue "Upload" button. This will take you to the "Upload new package" screen: | ||
| − | [[File:Cvmfs-repo-upload_upload.PNG|thumb|512px|left|The RAL CVMFS Stratum-0 Uploader | + | [[File:Cvmfs-repo-upload_upload.PNG|thumb|512px|left|The RAL CVMFS Stratum-0 Uploader - "Upload new package".]] |
<div style="clear:both;"></div> | <div style="clear:both;"></div> | ||
| − | Click on the "Select file" button, select your <code>hello-world_001-00-00.tar</code> tarball and then press the blue "Upload" button. The tarball should now be uploaded to your VO's repository. | + | Click on the "Select file" button, select your <code>hello-world_001-00-00.tar</code> tarball and then press the blue "Upload" button. The tarball should now be uploaded to your VO's repository, appearing on the right-hand side of the Uploader homepage with a white background (indicating that is uploaded). |
| + | |||
| + | Now you should be ready to deploy the tarball. This is done by pressing the "Deploy" button in the '''project content''' panel of the Uploader home page: | ||
| + | |||
| + | [[File:Cvmfs_deploy-button.PNG|thumb|left|The deploy button.]] | ||
| + | |||
| + | <div style="clear:both;"></div> | ||
| + | |||
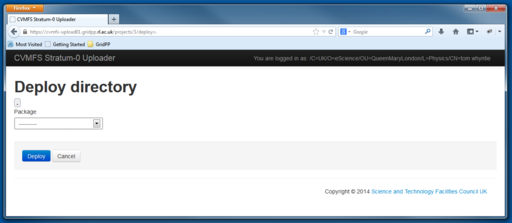
| + | You should now see the deploy page: | ||
| + | |||
| + | [[File:Cvmfs-deploy-page.PNG|thumb|512px|left|The RAL CVMFS Stratum-0 Uploader - the deploy page.]] | ||
| + | |||
| + | <div style="clear:both;"></div> | ||
| + | |||
| + | Click on the drop-down menu and you should see <code>hello-world_001-00-00.tar</code> available to select. Select it, then press the blue "Deploy" button. You should now be redirected to the home page, where <code>hello-world_001-00-00.tar</code> should be displayed with a green background to indicate that it has been successfully deployed to the repository. | ||
| + | |||
| + | It should take a maximum of three hours for the software to become available to worker nodes with the appropriate CVMFS access. If your local cluster has access to your VO's repository, you can check with: | ||
| + | |||
| + | <pre> | ||
| + | $ ls /cvmfs/cernatschool.gridpp.ac.uk | ||
| + | hello-world_001-00-00 | ||
| + | $ ls /cvmfs/cernatschool.gridpp.ac.uk/hello-world_001-00-00 | ||
| + | hello-world.sh README.md run.sh | ||
| + | </pre> | ||
| + | |||
| + | (<code>cernatschool.gridpp.ac.uk</code> is the address for the <code>cernatschool.org</code> VO - you can find out the corresponding address from the CVMFS uploader homepage.) | ||
| + | |||
| + | ====Run a job using your CVMFS software==== | ||
| + | |||
| + | Jobs using your software can be submitted and run as normal - but now you don't need to worry about installing software anywhere. The executables you need will be available in the CVMFS repository. So a JDL file for the Hello World! software (deployed on the <code>cernatschool.org</code> repository would look like this: | ||
| + | |||
| + | <pre> | ||
| + | $ cat helloworld.jdl | ||
| + | # The GridPP CVMFS Hello World! JDL file | ||
| + | Executable = "/bin/sh"; | ||
| + | # Replace "cernatschool.gridpp.ac.uk" with your VO's address, of course! | ||
| + | Arguments = "/cvmfs/cernatschool.gridpp.ac.uk/hello-world_001-00-00/run.sh /cvmfs/cernatschool.gridpp.ac.uk/hello-world_001-00-00"; | ||
| + | StdOutput = "stdout.txt"; | ||
| + | StdError = "stderr.txt"; | ||
| + | OutputSandbox = {"stdout.txt", "stderr.txt"}; | ||
| + | # | ||
| + | </pre> | ||
| + | |||
| + | As you can see, the shell executable is being run with two arguments: | ||
| + | |||
| + | # The script to run - <code>run.sh</code> - which is in the tarball. | ||
| + | # The first argument supplied to <code>run.sh</code>. In this example, the first argument of <code>run.sh</code> base directory (including the CVMFS prefix). We have made this an argument in the <code>run.sh</code> to make local testing easier - which, when the software gets more complicated, is a worthwhile thing to do... | ||
| + | |||
| + | So, if you're using <code>glite</code> for your WMS, you can submit the job as usual: | ||
| + | |||
| + | <pre> | ||
| + | $ voms-proxy-init --voms cernatschool.org | ||
| + | Enter GRID pass phrase for this identity: # you know what to do... | ||
| + | ...[proxy confirmation messages] | ||
| + | $ myproxy-init -d -n | ||
| + | Your identity: /C=UK/O=eScience/OU=QueenMaryLondon/L=Physics/CN=tom whyntie | ||
| + | Enter GRID pass phrase for this identity: # and again... | ||
| + | ...[proxy confirmation messages] | ||
| + | $ glite-wms-job-submit -a -o jobIDfile helloworld.jdl | ||
| + | ...[job submission messages] | ||
| + | </pre> | ||
| + | |||
| + | When you retrive the output from the jobs, <code>stdout.txt</code> should contain a very, very exciting message, indicating that your job has succeeded and the CVMFS software has been successfully deployed. | ||
==Useful links== | ==Useful links== | ||
* [http://cernvm.cern.ch/portal/ The CERN CVMFS page]. | * [http://cernvm.cern.ch/portal/ The CERN CVMFS page]. | ||
Revision as of 12:04, 1 May 2014
Contents
Deploying software with CVMFS
For more information about CVMFS at RAL, click here.
Overview of the process
- Prepare your working area
- Prepare your software
- Upload your software to the RAL CVMFS repository and deploy it
- Wait a bit...
- Run your CVMFS-powered jobs
A trivial example
Preparing your working area
Log in to your machine of choice and create a new working area.
$ ssh -Y whyntie@heppc402
whyntie@heppc402's password: # enter your password here

$ mkdir cvmfstests
$ cd cvmfstests
$ mkdir helloworld
$ cd helloworld
$ pwd
/users/whyntie/cvmfstests/helloworld
Preparing your software
Create a new directory that will form the basis of your CVMFS tarball.
$ mkdir hello-world_001-00-00
$ cd hello-world_001-00-00
$ pwd
/users/whyntie/cvmfstests/helloworld/hello-world_001-00-00
Create three files in this directory:
-
hello-world.sh- the "software"; -
run.sh- the script that runs the software; -
README.md- for your notes, ideally in the MarkDown format.
$ cat hello-world.sh
#!/bin/bash
#
#=============================================================================
#                     The GridPP CVMFS Hello World! Script
#=============================================================================
#
# Usage: . hello-world.sh [whoever you want to greet]
#
echo 'Hello' $1'!'
$
$
$ cat run.sh
#!/bin/bash
#
#=============================================================================
#                    The GridPP CVMFS Hello World! run script
#=============================================================================
#
# Usage: . run.sh [full path of the hello-world.sh script]
#
# Note that for grid jobs (or clusters with CVMFS enabled) this will be
# the CVMFS directory.
#
$1/hello-world.sh World
$
$
$ cat README.md
My CVMFS Test Notes
===================
You're keeping detailed notes, right? Good good.
Now compress these files into a tarball.
$ cd ../
$ tar -cvf hello-world_001-00-00.tar hello-world_001-00-00
$ ls
hello-world_001-00-00 hello-world_001-00-00.tar
Uploading and deploying the software
Now upload the tarball to the RAL CVMFS repository. You will need your grid certificate installed in your browser in order to access (and be identified).
$ firefox https://cvmfs-upload01.gridpp.rl.ac.uk &
After confirming certificate and security settings, you should be presented with a page like this (click to enlarge):
(Note: this is from the CERN@school VO, which has already had software uploaded. Your page should be blank...)
To upload the hello-world_001-00-00 tarball, click on the blue "Upload" button. This will take you to the "Upload new package" screen:
Click on the "Select file" button, select your hello-world_001-00-00.tar tarball and then press the blue "Upload" button. The tarball should now be uploaded to your VO's repository, appearing on the right-hand side of the Uploader homepage with a white background (indicating that is uploaded).
Now you should be ready to deploy the tarball. This is done by pressing the "Deploy" button in the project content panel of the Uploader home page:
You should now see the deploy page:
Click on the drop-down menu and you should see hello-world_001-00-00.tar available to select. Select it, then press the blue "Deploy" button. You should now be redirected to the home page, where hello-world_001-00-00.tar should be displayed with a green background to indicate that it has been successfully deployed to the repository.
It should take a maximum of three hours for the software to become available to worker nodes with the appropriate CVMFS access. If your local cluster has access to your VO's repository, you can check with:
$ ls /cvmfs/cernatschool.gridpp.ac.uk
hello-world_001-00-00
$ ls /cvmfs/cernatschool.gridpp.ac.uk/hello-world_001-00-00
hello-world.sh  README.md  run.sh
(cernatschool.gridpp.ac.uk is the address for the cernatschool.org VO - you can find out the corresponding address from the CVMFS uploader homepage.)
Run a job using your CVMFS software
Jobs using your software can be submitted and run as normal - but now you don't need to worry about installing software anywhere. The executables you need will be available in the CVMFS repository. So a JDL file for the Hello World! software (deployed on the cernatschool.org repository would look like this:
$ cat helloworld.jdl
# The GridPP CVMFS Hello World! JDL file
Executable = "/bin/sh";
# Replace "cernatschool.gridpp.ac.uk" with your VO's address, of course!
Arguments = "/cvmfs/cernatschool.gridpp.ac.uk/hello-world_001-00-00/run.sh /cvmfs/cernatschool.gridpp.ac.uk/hello-world_001-00-00";
StdOutput = "stdout.txt";
StdError = "stderr.txt";
OutputSandbox = {"stdout.txt", "stderr.txt"};
#
As you can see, the shell executable is being run with two arguments:
- The script to run -
run.sh- which is in the tarball. - The first argument supplied to
run.sh. In this example, the first argument ofrun.shbase directory (including the CVMFS prefix). We have made this an argument in therun.shto make local testing easier - which, when the software gets more complicated, is a worthwhile thing to do...
So, if you're using glite for your WMS, you can submit the job as usual:
$ voms-proxy-init --voms cernatschool.org
Enter GRID pass phrase for this identity: # you know what to do...
...[proxy confirmation messages]
$ myproxy-init -d -n
Your identity: /C=UK/O=eScience/OU=QueenMaryLondon/L=Physics/CN=tom whyntie
Enter GRID pass phrase for this identity: # and again...
...[proxy confirmation messages]
$ glite-wms-job-submit -a -o jobIDfile helloworld.jdl
...[job submission messages]
When you retrive the output from the jobs, stdout.txt should contain a very, very exciting message, indicating that your job has succeeded and the CVMFS software has been successfully deployed.


